Monday, March 7, 2016

My Top 5 Bath and Body Works Three Wick Candles


Happy March! You have no idea how many times I have tried to draft this post. UGH! Anyhow.....In this post I wanted to share some of my favorite Bath and Body Works 3 wick candles ! I am extremely addicted to these candles and almost always buy at least two new ones when the 2 for $24 deal pops up in my email!

What are your favorite candles from BBW?

#1 London Tea and Lemon

One of my all times favorites! This is my second candle. I am a tea lover and this thing smells just like tea with a hit of lemon. When I am just to trying to chill and relax from a long day London is the one I reach for first.

#2 Mahogany Teakwood

This one reminds me of getting a nice warm bear hug from my boyfriend. Nice, strong, and manly scent. Perfect to wind down the evening. 

#3 Sparkling Pear Riesling 


One Word: WINE!!! I don't know how they did it but this has replaced my weekly glass of wine for Thursday's HTGAWM. 

#4 Endless Weekend


AHHHHHH! So relaxing. I always burn this one when I'm ready for a long hot bath. It has a hit of ocean water and beach scent. 

#5 Paris Lavender and Macaron 

Love this on a lazy Saturday afternoon. I get fresh flowers when I burn this one. UGH! I love it!


So there you have it! My to 5 BBW candles. Stay tune this month I have a lot of DIY's coming up !!

-VS


Thursday, February 4, 2016

January Fabric Haul


2016 is starting off right !! January I made some fab fabric find courtesy  of www.iamsewblessed.com. She always have gorg fabric at a great price but you have to snatch them up when you can hunty because they will be gone! Here is what I snagged this past month. Now the challenge is what should I make with each fabric ???


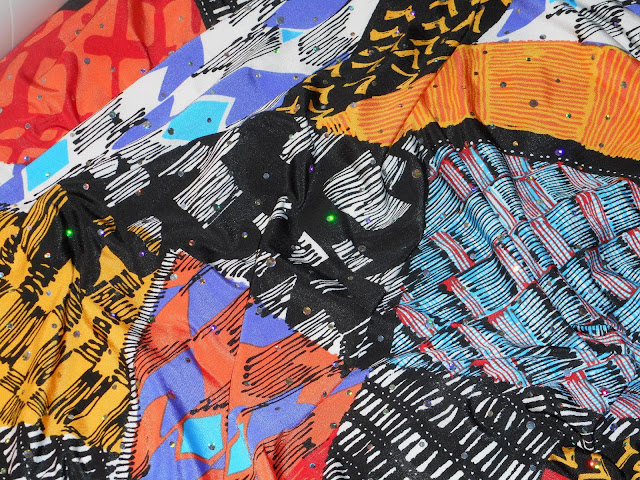
When I seen this fabric I just about died from gagging soon hard. It is a lycra knit and give a patch/ quilt look. I also have sequins through the fabric. Absolutely amazing. This the the fabric I want to work on first but I have no idea what to make. I wanted to make a flowly A- line skirt but I am also thinking a wrap dress will be super cute too!


The color combo on the fabric is what caught my eye! This is also lycra knit and the zebra print runs down the middle with the aquamarine colors flow down the sides. This is going to be hard to figure out what to do with since the print is so "up and down". The only idea I had for this one would be a maxi dress.


Combo leopard and zebra print?! Just take my money! I have so many ideas for this one I don't know where to start. My top choice would be a super cool and relaxed blazer. Hmmmmm...


Simple but yet super sexy. Black with an off white detail.  For this one I am thinking something long and fitted in the right places. Maybe an off shoulder valentine's day dress? 


This was actually a bonus from iamsewblessed which is why I am a customer for life. Its only a yard but I can see this becoming a head wrap for me. An Emerald color with gold diamonds. Nice!

So I did not go to crazy but I already have more fabric in the works for February's haul. What garments do you think I should make with these fabrics?


-VS


Tuesday, February 2, 2016

DIY African Print Maxi Skirt

Hi guys!

SO here is my first try in a tutorial ! I love to sew and when I seen this fabric at Joann's, i just knew i will be perfect for a maxi skirt with pleats. So without further ado, let get SEWING.

First here is what you will need:
1.  3 yards of african print fabric
2.  Fabric scissors
3.  A zipper ( I used a a 7in black one)
4.  Fabric chalk
5.  measuring tape
6.  a ruler (not shown)
7. and of course a sewing machine

Measurements: 

Measure how long you want to maxi to be. I wanted mines to be pretty long that it would completely cover my feet when walking. You will also need your waist measurement. I messed his part up and took my tummy measurement and had to take in the skirt a bit. Save yourself the trouble! Bend your torso from side to side; measure where the crease is. 

STEP 1: Fold your fabric in half. Take your length measurement and cut off any excess. Save the excess for your waist band.


STEP 2:
 Open your fabric. Measure out your waist size adding in 1 in seam allowance and inches for your pleats. For each pleats, I added 4 inches (2 inches for each side of the pleat). I added a total of 5 pleats. So here is my math: waist size in inches +1 inch seam allowance + 20 inches for pleats= total width. Cut any excess. 

STEP 3:
I like to add my pleats to the right side of the fabric. You can add yours to the wrong side of the fabric it just gives off a different look. Take 2 inches of fabric and fold it over (see below). Pin in place. Continue until you have the total number of pleats folded (in my case 5 pleats). 


Once you are completed with your pleats, your total length should equal your waist size + seam allowance. 


STEP 4: 

Press your pleats down and use a base stitch along the top to hold the pleats in place. Your sewing machine will be different but here is the settings on my machine for a base stitch: 


A base stitch is just meant to hold something ( in this case our pleats) in place.  It is a long sitching and sure not be used to sew your garment together. Here is how you bace stitch should look:


STEP 5:

To sew on you waist band, place waist band to the top of your skirt right sides facing and sew. Be sure to change your stitch setting to normal on your machine! Sew over the base stitch.


STEP 6: 

Zipper time! On one side of the open end of your skirt, place the zipper face down on the wrong side of the fabric. Pin in place and sew. I do not use a zipper foot because it just takes too much time to swap the foots on my machine. I just take my time and zip/unzip the zipper when need to get the zipper attached. Zipper foot will make the process easier but do what works for you. Repeat process on the other open end.
(Zipper attached to one of the open ends of the skirt) 


STEP 7: Pin the rest of the skirt down and sew close.

(Skirt Pinned)

(Sewing the skirt down)


STEP 8:
Press the pleats and hem the bottom.  Now your skirt is completed! Try it on and take some photos! If you try the skirt share it with me using #vertigoDIY on IG and Twitter.


Until next time. 

-VS